Development Environment
Install SystemC Library
Native Linux Library
To install SystemC, first you have to install some dependencies, by running;
sudo apt-get install build-essential
Download SystemC 2.3 from https://github.com/systemc/systemc-2.3. After downloading, extract it. Now we need to compile and install it by running;
cd <extracted-dir>
./configure --prefix=/usr/local/
make
sudo make install
Docker Container
First install Docker by following;
Now you should open a shell (e.g. cmd.exe or Powershell for windows; bash or any terminal for linux) and download the pre-built Docker image with SystemC pre-installed. To download the Docker container run;
docker pull pjcuadra/sc_viterbi
To start the container run;
docker run -d --rm --name systemc -v <your-sc_viterbi-src-code-path>:/root/ \
-p 1122:22 pjcuadra/sc_viterbi:latest
Warning
Don’t forget to update the <your-sc_viterbi-src-code-path> placeholder.
Once you have your docker running you can ssh into it as follows;
ssh root@127.0.0.1 -p 1122
Inside the docker you’ll find your code and you can build it as specified in the section Build the code.
Build the code
Once the dependencies are installed you can build the code by running;
cd <your-sc_viterbi-src-code-path>
mkdir build
cd build
cmake ..
make
Warning
If you are building inside the docker image the <your-sc_viterbi-src-code-path> is /root/.
Build the docker container
If you want to build the image locally you can do it so. The Dockerfile is provided at ci/Dockerfile. For building the image run;
cd <your-sc_viterbi-src-code-path>/ci
docker build -t pjcuadra/sc_viterbi:latest .
Warning
Dockerfile and the pjcuadra/sc_viterbi image on Docker server shall be on sync. If theres a change needed in the image please also change it in the Dockerfile and push the new image to the Docker server.
Run Tests
This project has a newly created testing framework for SystemC. More about the framework here Testing Framework. To run the tests first you need to compile the tests executables by running;
cd <your-sc_viterbi-src-code-path>
mkdir build
cd <your-sc_viterbi-src-code-path>/build
cmake ..
make
make compile_tests
The testing framework uses CTest for running the tests and you can do so by running;
cd <your-sc_viterbi-src-code-path>/build
make test
The output will look something like;
Running tests...
Test project /root/build
  Start 1: full_adder_ut
1/8 Test #1: full_adder_ut ....................   Passed    0.00 sec
  Start 2: clock_divider_ut
2/8 Test #2: clock_divider_ut .................   Passed    0.00 sec
  Start 3: shift_register_ut
3/8 Test #3: shift_register_ut ................   Passed    0.00 sec
  Start 4: serializer_ut
4/8 Test #4: serializer_ut ....................   Passed    0.00 sec
  Start 5: convolution_ut
5/8 Test #5: convolution_ut ...................   Passed    0.00 sec
  Start 6: encoder_ut
6/8 Test #6: encoder_ut .......................   Passed    0.00 sec
  Start 7: convolution_shiftreg_ut
7/8 Test #7: convolution_shiftreg_ut ..........   Passed    0.00 sec
  Start 8: decoder_ut
8/8 Test #8: decoder_ut .......................   Passed    0.00 sec

100% tests passed, 0 tests failed out of 8

Total Test time (real) =   0.04 sec
View Simulation Results
Our testing framework automatically generates a VCD trace file for every test. To view the simulation results you can use any VCD visualizer software we recommend to use gtkwave. For instance the result of the encoder_ut can be viewed by opening gtkwave and open the file at <your-sc_viterbi-src-code-path>/build/trace/enconder/encoder.vcd. You can also run;
gtkwave <your-sc_viterbi-src-code-path>/build/trace/enconder/encoder.vcd
After adding all signals to the visualization area and adjusting the scale the simulation results looks like in Fig. 1.
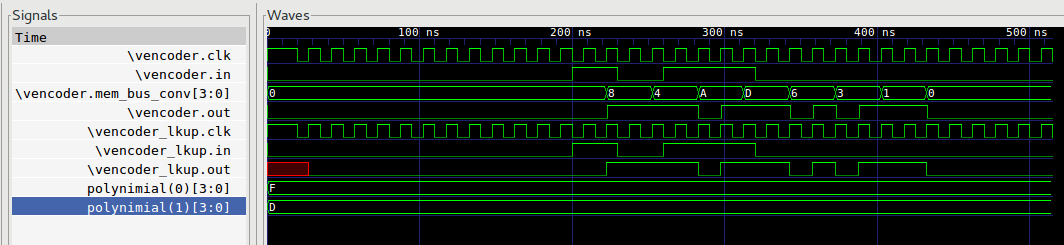
Fig. 1 Encoder Simulation Preview
Note
Traces are located at <your-sc_viterbi-src-code-path>/build/trace and have the same directory structure as the tests at <your-sc_viterbi-src-code-path>/test/src
Warning
The Docker image doesn’t provide gtkwave you’ll need to install it separately.
Git Workflow
Since we are using Github to host our repository we are mainly using their git workflow. You can read about it at, Github Flow
Furthermore every Pull Request can only be merged back to master branch if it passes all our tests running on CircleCI.